Quantcast
Channel: Paul In The Lab
Viewing all 99 articles
Browse latest View live

Peizo Pickup Transducer Preamp Stripboard Veroboard Layout

$
0
0

this is actually from a request from a guy called Jim (sorry don't know your last name) who wanted a peizo preamp because they are so expensive. they are essentially just a high impedance preamp
and you could probably use this for other things like hiZ microphones and whatever.

there is a gain control on this and it uses an op-amp that is able to function as a single rail op-amp which cuts down the component count which is always useful when you need to hide this inside a guitar cavity or something.


Mini Push Pull Amplifier Stripboard Veroboard Layout

$
0
0

This is a bit of an experimentalist amplifier - the transistors on the BoM won't give you that much amplification however if you put some power transistors in there like BDT63/BDT62 you will get a lot more amplification.

I made this for my iPods headphones and essentially what I did is make one board for each channel so I can stack them on top of each other and it is quite a compact nice little amp.


Marshall Bluesbreaker Stripboard Veroboard Layout

$
0
0

There is no schematic for this because I did this one years and years ago and I can't find the schematic that had the right component numbers to it and usually it causes confusion when components don't match their numbers on the schematics.
This particular layout was made from tracing an original unit and some of the component values differ from schematics that are on the net and I assume that they either cloned theirs without removing the components and measuring them and just went by what the component was marked as - this is where people go wrong because some manufacturers mark their components wrong to hinder cloners.

anyway here is the layout


Devils Drone Sequencer Veroboard Stripboard Layout

$
0
0

This has taken some time to design and it's not perfect but it sounds pretty cool (As you can hear from the sample) it follows on from the devils triangle I did earlier this year ( Found HERE and no you don't have to build that to make this work!)
This is quite a big project and as you can hear I have built it using the stripboard layout provided (as I do with all my layouts) so take your time because I really can't spend lots of time answering why things don't work. The truth is that unless you have the board in front of you there is no possible way to troubleshoot things. But if you take it slowly it should be good.
also don't forget to check out the "tips and troubleshooting" page above

I would also recommend not to do this if you're in-experienced


S.A.L.O. (Smooth And Light Overdrive) Stripboard Veroboard Layout

$
0
0

This is just a little overdrive circuit I threw together the other day - I had an MXR octave fuzz that refused to work so I gutted it and made this thing to fill the box.

I didn't use a schematic or any pre-planning I just threw it together and hoped it did something and it did and it was quite a pleasing something. I will trace it so I've got a schematic to post at some point but until then here is the layout


The first 10 seconds is the guitar with no overdrive on

Sound Activated Dancing LEDs Stripboard Veroboard Layout ( for the holiday seasons )

$
0
0

With all the various holidays coming up I thought I would do a nice decorative project. This makes LEDs light up with any kind of sound - it might make a cool halloween effect that makes LEDs flicker as people walk past your house or you could have it on your TV or something at christmas or of course anything else you could think of (if you have any ideas let me know)

as usual it is built and tested - it works beautifully and is quite sensitve however if you want to control the sensitivity change R4 to something like a 2K potentiometer or trim pot and adjust to suit.

for the microphone I used one I salvaged from and old phone similar to ( Mouser number 665-POM5238PR ) but I'm sure any kind of microphone will work.


Adjustable Pocket Power Supply Stripboard Veroboard Layout

$
0
0
This is something I've been meaning to make for quite a while.

Basically the idea was that should you go around charity shops, car boot sales, yard sales, thrift stores and other such places it would be nice to have a power supply capable of giving you various voltages to check if things you are potentially going to buy actually work. the resistors are selected for 3 volts, 5 volts, 9 volts and 12 volts and you may notice that the resistor values (R2, R3, R4 and R5) are very specific and in some cases not available - these values are due to not being able to alter R1 when you switch the voltage.  

there are 2 ways to get around this

1.add resistors in series or parallel eg. for R5 I put 2K and a 68r resistor in series and that was near enough to get me my 12 volt output

OR..

2. use 5K/4.7K trimpots and calibrate with your DMM - using that method you can of course easily set it for voltages you think you will need the most.


Logic Pulse Generator - Logic Pulser Stripboard Veroboard Layout

$
0
0

Often with projects that uses Logic devices such as previous projects like the devils drone sequencer or the Sound Activated Dancing LEDs you need to create a clock signal to make the logic transition from one state to the other. you don't want to have to deal with the clock (or oscillator) part of the circuit in the experimentation stage so you need something that is capable of creating a clock signal. This is just that piece of test gear.

it also uses the same power supply you're using to power the Logic ICs in question.

here is an example of a commercial version http://uk.rs-online.com/web/p/needle-point-probes/5375163/?origin=PSF_437277|alt

aswell as the layout and schematic - I have included some oscilloscope pictures of what it actually does.

Sorry if my explanation is a little off today in the making sense department - I am suffering from cluster migraines and one of the symptoms is Aphasia. the important thing is that the actual layout and circuit are correct - which as you can see - is the case!


As you can see I have soldered a nail to the pulse output - I've found this is the ideal probe


Rez Overdrive Stripboard Veroboard Layout

$
0
0

I've been working on a lot of projects recently which I couldn't really post on here due to complexity etc.
but today I thought I would try and design something for my blog using one of the cool parts I got from Linear Technology
and thus born was the Rez Overdrive which you can use on guitar (demo at bottom) or synths etc.
the Whole circuit only draws 2.45543mA (yes, I got a 6.5 digit meter recently - it's a Keithley 2015 THD - check it out if you like multimeter porn)) so in theory it will last a hell of a long time if you use batteries.

Also I added D1 as an afterthought to protect the circuit from reverse polarity accidents - so it isn't on the schematic.


Dark Activated LED Flasher Striboard Veroboard Layout

$
0
0

Around here we get the odd brown out because the local transformer station is inadequate and hasn't been updated since the 50's so obviously it can't handle the fact that houses have more than one electrical appliance. anyway I made this low power device to be put with my torch so I can find it when all the lights go off.

after you build it - you adjust VR1 so that the LED blinks when it's dark and it should last quite a while with 2 1.5v batteries powering it.
try and get the lowest power LED you can find - remember, it will also blink all night.


Adjustable Load Stripboard Veroboard Layout

$
0
0

I've done a similar adjustable load before but I've tweaked this one a little so it performs better and so on.
PSU UT = power supply under test
the one I made can sink over 2 Amps. you just need to make sure you have a big heatsink.!

it's also a good idea to mount the big resistors offboard cause they get hot.


MP3 / iPod Headphone Amplifier TDA2822M Stripboard Veroboard Layout

$
0
0

The TDA2822M IC is a stereo power amplifier that I often come across in old walkmans/radios so I thought I would make a stripboard project for you people. Because I'm sure if you're an avid junk collector like me you will probably have one of these however if you don't; no worries you can buy them really cheaply from the grey market (or probably on digikey or something) below is a link to a grey market china shop I use often and so have had no trouble with. you could buy 50 of them for £3.56 ! so if you have 50 friends who have iPods that can't power headphones properly because they have piss weak amplifiers in them - since that idiot sued them - you can make 50 headphone amplifiers and sell them to your mates or whatever. Grey Market ICS

Anyway using this kind of IC is much better than using that well known CMOY amp design that is essentially more of a line buffer (which is useful in itself) but doesn't give you any extra power - where as this does!

The other cool thing about this IC is that you can run it from as low as 1.8 volts.

I know I will get questions asking me about its performance using different headphones so I am going to preemptively post the typical output power from the datasheet.

if you're new to reading datasheets this may look abit like gibberish but I'll give you a quick description of what you're looking at.
this is the part of the datasheet that deals with "Po" or power output and this is measured inwatts (or in this case miliwatts
and they get these results from using a 1 KHz sinewave which is a typical test condition for testing a lot of electronic components (as listed under the Parameter section)
They then list the "Test Conditions" which in this case uses Rᴸ (Resistive Load - which in this case is a pair of headphones)
the other number "Vs" - is "Voltage Supply" (which I'm sure you know is whatever voltage you're powering it with)

Then we get to the Min./Max section - this is basically the Power Output of the IC (in miliwatts) using some basic test conditions.

So.. using this table I can get an idea of the Power Output with the headphones I own.
for example I have a pair of headphones on the desk here (for abuse)
using my meter on the resistance range I know that their impedance is aboutand I am powering the stripboard (below) using 2 AA batteries which should be 3 volts.
using the table above I know that the Power Output will be about 110mW - which is very dam loud when we're talking headphones. (there will obviously be some discrepancy because music isn't just a 1KHz sinewave but it's good enough to gauge how much Power we're going to get out of this thing.

Hopefully that is clear enough to understand (I know I'm not the best at grammar etc. - my brain is often all over the place)
but I urge you to take a look through the whole datasheet because it's very interesting (most datasheets are) HERE

Anyway - when you turn this on don't have your headphones on/in your ears in case you've made a mistake or your MP3 player is playing too loud. Use this amplifier at your own risk


PCB Silkscreen Designators

$
0
0

this isn't a stripboard post for a change (though one is coming soon). however it is useful to know what I'm about to write if you salvage parts or want to fix electronic items.

on PCBs (and other electrical installations) you will often be confronted with silkscreen designators like shown below (the white writing on the board)

here is a list of what each abbreviation stands for.

A - Separable assembly or sub-assembly (e.g. printed circuit assembly)
AT - Attenuator or isolator
BR - Bridge rectifier
BT - Battery
C - Capacitor
CN - Capacitor network
D - Diode (including Zeners, thyristors and LEDs)
DL - Delay line
DS - Display
F - Fuse
FB or FEB - Ferrite bead
FD - Fiducial
FL - Filter
G - Generator or Oscillator
GN - General Network
H - Hardware
HY - Circulator or Directional coupler
J - Jack (least-movable connector of a connector pair) | Jack connector (connector may have "male" pin contacts and/or "female" socket contacts)
JP - Link (Jumper)
K - Relay or contactor
L - Inductor or coil or ferrite bead
LS - Loudspeaker or buzzer
M - Motor
MK - Microphone
MP - Mechanical part (including screws and fasteners)
P - Plug (most-movable connector of a connector pair) | Plug connector (connector may have "male" pin contacts and/or "female" socket contacts)
PS - Power supply
PZ - Piezo Buzzer
Q - Transistor (all types)
R - Resistor
RL - Relay
RN - Resistor network
RT - Thermistor
RV - Varistor
S - Switch (all types, including push-buttons)
SCR - Thyristor
T - Transformer
TC - Thermocouple
TH - Thermistor
 - types of thermistors are..
   PTC - Positive temperature coefficient - the resistance rises with increased heat
   NTC - Negative temperature coefficient - the resistance decreases with increased heat

TUN - Tuner
TP - Test point
U - Inseparable assembly (e.g., integrated circuit)
V - Vacuum tube - Or VALVE!
VR - Variable resistor (potentiometer or rheostat)
X - Crystal
Y - Crystal or oscillator
Z (or ZD) - Zener diode
    
AE: Aerial, antenna
B: Battery
BR: Bridge rectifier
CRT: Cathode ray tube
CR: Diode
DSP: Digital signal processor
FET: Field-effect transistor
GDT: Gas discharge tube
IC: Integrated circuit
J: Wire link ("jumper")
JFET: Junction gate field-effect transistor
LA: Lightning arrester
LCD: Liquid crystal display
LDR: Light-dependent resistor
LED: Light-emitting diode
MCB: Miniature circuit breaker
Mic: Microphone
MOSFET: Metal-oxide-semiconductor field-effect transistor
MOV: Metal oxide varistor
Ne: Neon lamp
PLC: Programmable logic controller

Onboard Guitar Preamp Drive Stripboard Veroboard Layout

$
0
0

This is a little preamp to go inside your guitar rather than as an external pedal which is why it has no controls - feel free to add your own of course!
in the sound sample I recorded the same thing a few times - 1st with the guitars volume at quarter way 2nd halfway and 3rd full way up.


last of all - this is the 88th stripboard layout which is a special number to me cause I'm a big back to the future fan !


MXR Hot Tubes Stripboard Veroboard Layout - Craig Anderton Tube Sound Fuzz Variant

$
0
0


I couldn't find any information on this circuit - I found the original schematic on the free info society website but literately 5 minutes ceaseless searching on google brought up nothing about the MXR version. Anyway I redrew the schematic because the original was terrible, then laid it out and built it.
it sounds pretty cool. unfortunately I ran out of space to upload a sound sample to "soundcloud" but I imagine it sounds similar to the Craig Anderton version.

anyway enjoy.


Acoustic Probe / Electronic Stethoscope ( based on Robert Penfold Design ) Stripboard Veroboard Layout

$
0
0

I was trying to track down a noisy inductor (I like to call them a squealer) in the back of a monitor so I thought I would design a electronic stethoscope - then I remembered I had one from something I built from Robert Penfolds article in a practical electronics (silicon chip magazine for people in other countries) magazine in my youth. so I checked my box o'junk and found that I had salvaged parts from it.
So I made myself a new stripboard layout and built a new one. I had to change the odd part cause the original called for stuff that costs stupid money by opportunist eBayers.
But it works a lot better than the old one ever did - so hurray for opportunists I guess.

I use this to drive a pair of in-ear headphones and it really does work really dam well. so if you need something to track down the source of noise or spy on people through the wall or something - this is for you.


Linear PC Fan Speed Controller Stripboard Veroboard Layout

$
0
0

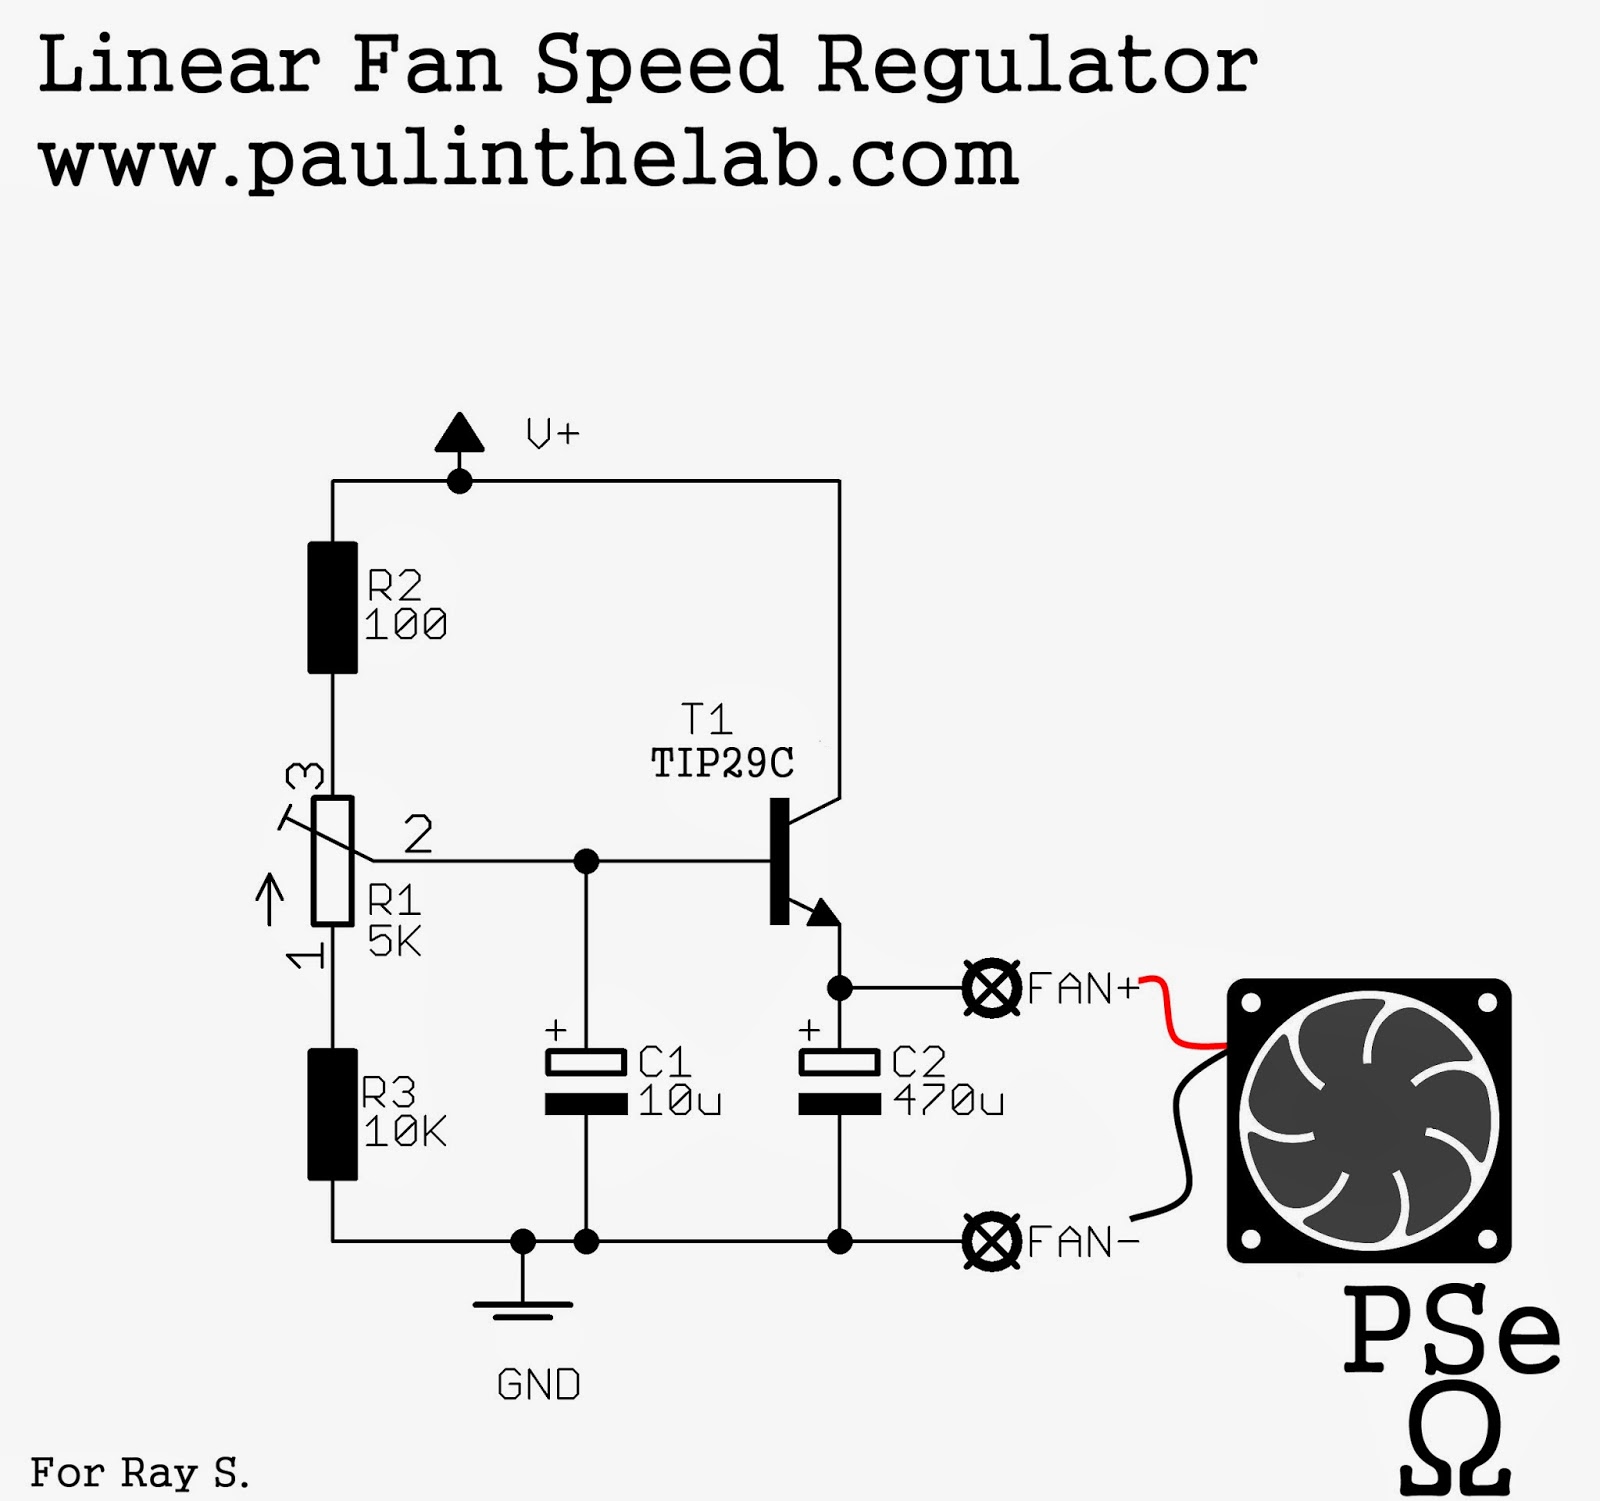
Extremely simple fan speed controller.

the input voltage depends on the fan you're using however the fan I used is a 12 volt fan so mine is powered by a 12 volt power supply.

I made this for a soldering iron fume extractor however it will work for your PC fans too and I plan on using it in mine.


Splitting Single Supplies For Op-Amps etc. Stripboard Veroboard Layout

$
0
0

a while ago I did a split supply circuit fragment which included a voltage follower HERE - however there are much cheaper ways of achieving split supplies for experimentation with Op-Amps and other dual supply IC's (obviously this is for low power circuits eg guitar FX development etc.)

The first example uses a Trim pot to divide the voltage which is pretty cool for biasing to favor either the positive or negative rail.

The second example is the most common type of rail splitter - cheap as buggery and does its job. in the example I've given - it will divide the voltage in half so that if you put in 9 volts you get +4.5v and -4.5v

The Third example uses Zener Diodes to give you a regulated split supply - however you do lose a volt or 2 so you need to supply them above their combined values.
eg if you use 2 5.1 volt diodes in the circuit provided - you need to supply it with 11 - 12 volts to get +5.1v and -5.1v

I shall include a table of Zener diode values at the bottom that I found in some datasheet a long time ago - unfortunately I am not sure where it came from because as usual I only saved the relevant page so if you stumble across this page and it's yours or you know whose it is - let me know so I can give you credit etc. I assume it's National Semiconductors though.


Battery Simulator With Voltage Sag And Bar LED Indicator Stripboard Veroboard Layout

$
0
0

This is sort of a request - I was asked if I had a layout for the KAT Deacy Amp Battery Simulator which of course I don't but I thought "it can't be that hard to design one"
the KAT one has a "voltage sag" control on it to simulate the various battery discharge states so I designed that into it as well.
I thought however; I would go one step further though and include a battery state monitor too which is configured to show the working voltage of a 9 volt battery.

I thought it would be a good idea to do this little project because it has many uses outside of the Deacy amp - you can of course use it to sag the voltage of any 9 volt device such as guitar FX pedals which I know people like to do.

As you can see - I tested this using my constant current load set at 100mA and even pushed it to 200mA but I didn't want to go too far because I couldn't be bothered to find a heatsink. you can get upto 1.5 Amps if you use a decent heatsink.


Atari Punk Console Stripboard Veroboard Layout

$
0
0

Another quick one. A favorite among beginners - originally by Forrest Mims
I got an email this morning asking to check over a layout he'd found and also how to add a volume pot so I just did a new layout, built it and made some stupid noises for half an hour and now I'm posting it here.
this is obviously the version that is adapted to use 2 single 555 timers rather than 1 dual 556 timer but it's the same. 

have fun.


Viewing all 99 articles
Browse latest View live